Ch.10 메일 서버 설치 및 운영
10.1 메일서버의 개념
이메일 송수신에 사용되는 프로토콜 3가지
SMTP: 서버 간 송신, 클라이언트에서 송신
POP3: 서버에서 수신(받고 서버에서 삭제) - 과거에는 서버 용량이 적었으므로 관리 차원에서 삭제
IMAP: 서버에서 수신(동기화)
메일 서버 + 메일 클라이언트(로컬)
Agent -> Client 프로그램
Ansible Agentless
/var -> 운용, 사용 간 발생하는 데이터
--------------------------------------------------
server A mail 1
Server B: mail 2
Server C: DNS
Linux client: clients
--------------------------------------------------
server C dns 구축
1. dnf -y install bind --nogpgcheck
2. systemctl --now enable named
3. vi /etc/named.conf (캐싱 DNS 서버)
4. vi /etc/named.rfc1912.zones (마스터 DNS 서)
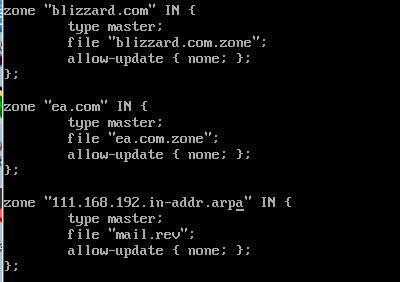
*메일 서버는 역방향 존까지 반드시 필요
5. cd /var/named
- cp -p named.empty blizzard.com.zone
- cp -p named.empty ea.com.zone
- cp -p named.empty mail.rev


6. 점검
- systemctl restart named
- named-checkconf
- named-checkzone blizzard.com blizzard.com.zone
- named-checkzone ea.com ea.com.zone
*named-checkzone command not found
dnf -y install bind-utils --nogpgcheck (nslookup도 포함)
- nslookup으로 확인

7. 방화벽 해제
- firewall-cmd --add-service=dns --permanent
- firewall-cmd --reload
8. setenforce 0
--------------------------------------------------------------
server A mail server1 구축 [server B도 같은 과정]
1. 호스트 이름 변경
hostnamectl set-hostname mail.blizzard.com
2. sendmail 설치
dnf -y install sendmail
3. sendmail 도메인 설정 (sendmail 설치 후)
vi /etc/mail/local-host-names
4. sendmail 패키지 설치
dnf -y install sendmail-cf dovecot
5. vi /etc/mail/sendmail.cf
86행 도메인 이름 적용
267행 외부 접근 허용(Addr=127.0.0.1, 제거)
6. vi /etc/mail/access

- 적용 명령어 꼭 입력 (makemap hash /etc/mail/access < /etc/mail/access)
- systemctl restart sendmail
7. vi /etc/dovecot/dovecot.conf
- 24, 30, 33행 주석 해제
8. vi /etc/dovecot/conf.d/10-ssl.conf
- 8행 ssl = yes로 변경
9. vi /etc/dovecot/conf.d/10-mail.conf
- 25행 주석 해제, 166행 주석 해제
- 121행 주석 해제 후 mail_access_groups = mail
10. 사용할 계정 생성
- useradd gamer
- passwd gamer
11. 서비스 재시작
- systemctl restart sendmail dovecot
12. 방화벽 개방
- firewall-cmd --add-service={smtp,pop3,imap,imaps,pop3s} --permanent
- firewall-cmd --reload
*firewall-cmd --runtime-to-permanent (permanent 후 reload하는 것과 같은 효과)
-----------------------------------------------------
Linux Client
클라이언트에서 로그인
리눅스 클라이언트
evolution
P.573 참조
*25번 포트 - SMTP
------------------------------------------
웹 메일의 설치
server A
1. dnf -y install php* httpd mariadb-server
2. 라운드 큐브 설치
- https://roundcube.net/download/
- /var/www/html에 압축 풀기 (rc로 이름 변경)
3. systemctl --now enable mariadb httpd
4. 방화벽 열기
- firewall-cmd --add-service={mysql,http} --permanent
- firewall-cmd --reload
5. 폴더 권한 변경
- chown -R apache.apache rc
6. DB 생성
- create database emaildb;
- grant all on emaildb.* to 'emailadmin'@'localhost' identified by '1234';
- flush privileges;
7. 웹에서 확인

*


8. 세팅 후 로그인
192.168.111.100/tc
설정에서 신원 gamer@localhost를 gamer@blizzard.com으로 바꾸고 자기에게 보내기 성공